what connecting cable do i need to connect my 2004 21 imac to 27 imac?
Ever wanted to connect a Mac to a Television receiver screen? Perhaps you want to utilize the Television set as a giant external monitor, to play games on a big screen, or just for video playback and movie streaming? It'due south actually quite easy to practice, and we'll comprehend the unabridged process from get-go to cease. We're going to focus on connecting whatever newer Mac to any fairly modernistic Goggle box by way of a physical HDMI connection, thus, a few third party accessories will be necessary for the job. The result will exist the Mac exporting both video and sound signals to the Boob tube.

HDMI is really the best style to connect a MacBook Air, MacBook Pro, MacBook, iMac, or Mini to an HDTV screen, whatever your intended usage purpose is. Yes, the AirPlay feature can also consign a screen to show upwards on a Tv set through an Apple TV box, but the HDMI method has several singled-out advantages; information technology's cheaper, resource usage is considerably less, in that location are no slowdowns, the video quality does not depend on network latency, and it's only generally much more versatile, making the only real downside to the HDMI arroyo being the physical cable connectivity. Lets get started and cover the basic requirements first.
Requirements:
Nearly every semi-modern Mac will fit the bill, but you will demand the following:
Annotation most HDMI adapters and audio support: there are many options available on Amazon and some are very inexpensive, many of which will non actually carry audio despite advert that they practise. More often than not, the adapters that price a little bit more tend to exist more reliable, so be sure to read the reviews and make sure that audio does indeed piece of work for the adapter you are ordering. I've had the best experience with the Monoprice brand, just your mileage may vary. Also note that for 2010 and older Macs, the Mini-DVI to HDMI adapters do non comport audio at all, thus you will need a separate sound output option that we won't cover here (external speakers, separate audio cable, etc).
If you programme to command the Telly using your Mac from a distance, spend a couple extra bucks on a longer HDMI cable. 15 feet is usually adequate for virtually cases, but if you have a gigantic room you may desire a longer cable.
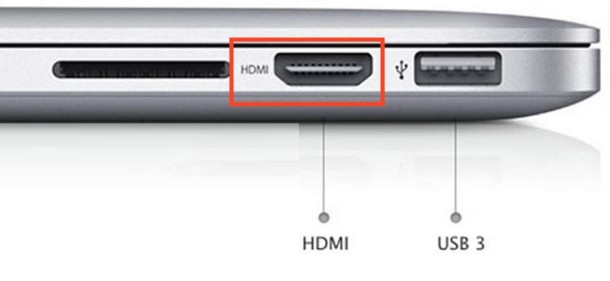
For the purpose of this walkthrough nosotros'll focus on the newer Mac models with a congenital-in HDMI, Mini-DisplayPort, and/or Thunderbolt ports, this guide was crafted using a MacBook Air and MacBook Pro, just the same applies to newer Mac Mini and iMac models as well. Again, notation that the latest MacBook Pro models have an HDMI port, so you wouldn't need an adapter on i of those MacBook Pro models, you can just direct connect an HDMI cable betwixt the Mac and the TV.
Connect the Mac to the TV with HDMI & Adapter
Establishing the initial connexion is remarkably straightforward and is but a affair of physically connecting the cables to one another from the Mac to the Telly.
If the MacBook Pro has an HDMI port, you lot tin can but connect the HDMI cable to the port, this is what it looks like:
If the MacBook, MacBook Air, MacBook Pro doesn't have an HDMI port, and y'all have never connected annihilation to a Mini-Display Port or Thunderbolt Port, you're looking for this port which requires the adapter:

The location of the video output port varies per Mac model, but it's normally on the correct-side of the MacBook Air, the left side on the MacBook Pro, and it's always on the back of the iMac and Mac Mini. The Mini-DisplayPort to HDMI adapter that connects to the Mac will look something similar this:

With everything ready, it's time to hook everything up and get the connection going, here's how to connect the Mac to a TV with HDMI:
- Connect that HDMI adapter to the video output port on the Mac
- Connect the HDMI cable to the adapter (or directly to the Mac if information technology has an HDMI port) and the other finish of the HDMI cable needs to go into an available HDMI source port on the back or side of a TV
- Plough the Mac on if it isn't already
- Flip the Tv's video input source over to HDMI (often through a "Video Source" button on the Television set's remote control)
The Mac should instantly recognize the TV and extend the desktop over to the HDTV's screen. If that doesn't happen, you lot are probably on the wrong video source of the TV, so endeavor another HDMI source. Some modern HDTV's accept up to vi HDMI ports, meaning you'll accept to flip through each of them to find the proper one carrying the Macs video and sound output bespeak. You'll know it works because the desktop shows upwardly on the Television set instantly similar this:

If you lot're satisfied with this alone, which basically makes the TV an external brandish, and so you can call information technology quits here. On the other hand, if you're looking to watch movies through apps, watch spider web video, or apply some other playback source from the Mac on the larger TV screen, and so y'all'll desire to take a few boosted steps to greatly improve the experience. Plus you'll probably want to go sound working properly, as yous'll notice by default audio won't play through the Television screen and stays playing through the Macs speakers instead. Read on to optimize the Tv for video playback, get sound working, and for some more tips for having the all-time feel.
Configure the Mac Video Output for Optimal Display on the TV Screen
By default the Mac will endeavor to use the Television as an external display, extending the desktop to the Television receiver screen. That's peachy if you lot intend on using the Tv set as a large external monitor, but if you lot're aiming to picket video or a pic, or play games, you're better off using Display Mirroring in many case. Option A describes how to do this easily:
A: Set Up Mirroring
- With the Mac connected to the Goggle box, open up Organization Preferences
- Choose "Displays" and so click the "Arrangements" tab
- Check the box for "Mirror displays"

While this almost always looks better on a 720p TV screen, that's not ever the case for 1080p HDTV's. Since the 1080p resolution is greater than that seen on many Mac displays, you'll either need to calibration down the resolution, deal with a pixelated image, or but set the external brandish every bit the primary display and become into full-screen mode on the TV screen when playing video as described in Option B:
B: Set the TV Display as the Primary Display
- Open System Preferences from the Apple menu afterwards the Mac & TV are continued to one some other
- Choose "Displays" and then go to the "Arrangements" tab
- Drag the white menubar from the smaller built-in brandish to the external TV display, thereby turning the Television receiver into the primary screen

This will reverse the default configuration of a dual-display setup, thereby turning the Macs screen into the extended desktop, and the HDTV as the primary desktop where the card bar shows and apps appear by default.
Change Sound Output from the Mac to TV via HDMI
Unless the Mac is hooked upwardly to some not bad external speakers, you'll almost certainly want to gear up sound output to go through the Boob tube's speakers rather than the tiny ones built into the estimator. For simply about every HDMI based Mac-to-TV connection, these audio settings must be adjusted manually after the two have been fastened to one some other and video is already displaying on the TV screen:
- Open up System Preferences from the Apple tree menu and choose "Audio"
- Click the "Output" tab and look under the "Blazon" list to find the "HDMI" selection and select it

The Output tab will normally bear witness the TV's model name, but since most people don't know the model number of their TV that'southward fairly meaningless and it's much easier to just look for "HDMI" in the listing. In the screenshot example, the LCD HDTV'due south model is "VO320E" for a Visio 32″ simply the names are often much more convoluted than that.
Note that once y'all set the audio output to go through the TV you will lose the ability to adapt the sound volume levels through the Mac's audio output controls, meaning you'll need to employ the TV's born volume adjustment buttons or a remote command.
Go a Good Video Playback App
If the entire reason you're doing this is to watch videos on a bigger screen, be sure you go a expert video playback app. Here are four bully costless apps:
- XBMC – media center and much more than, plays almost any video you tin throw at it
- Plex – media centre app that likewise plays virtually every video format
- VLC – barebones but powerful video playback app that works with most all video formats
- MplayerX – more full-featured video player that is compatible with the majority of video formats
QuickTime Player is also a fine choice for playing .MOV, m4v, .mp4 files, but for other picture show file formats like .WMV, Flash .flv, .mpeg, .avi, and others, y'all'll want to get a third party app instead. For other formats, VLC is a archetype app and should exist included in merely about every Mac users app toolbox, and MplayerX is condign increasingly popular for being but as versatile while having the added bonus of supporting BluRay and MKV playback.
Both XBMC and Plex are total featured media apps, which are capable of turning a Mac into a media heart when they're running. If y'all accept a spare Mac, you can fifty-fifty plow it into a full-fourth dimension media heart, server, and torrents box, and the Mac Mini is particularly great for that purpose.
Video Playback Too Small? Blackness Bars Showing? Use Screen Zoom
Not all movies or videos will play at true total screen, and sometimes you'll terminate upwards with a large black border effectually the sides of the video. This is oftentimes true with many web-based streaming movies, or when playing video that is lower resolution in general. Some playback apps like QuickTime and VLC have the ability to play video at one.5x and 2x resolution to solve that problem, but for web players and other apps y'all can just utilise screen zoom instead.
First, let's enable screen zoom if you lot oasis't washed so notwithstanding:
- Open up Organization Preferences from the Apple menu and cull "Accessibility"
- Choose "Zoom" and enable the zoom features, cull either the keyboard shortcut or zoom gesture option

Optionally, check the "Smooth Images" pick to endeavor to have less pixelation when zoomed in, though this tends to blur the picture for heavy zooming and can look strange. You lot're better off trying this out yourself to see if it works for the video you lot desire to spotter.
Now to put this to you apply, play dorsum a video as usual either from a web player or movie file, centre the mouse cursor in the eye of the video, and at present utilize the zoom characteristic to eliminate the blackness borders. For those who enabled the gesture option, this is done past belongings the "Command" key and then using a two-fingered up gesture to zoom in (or two finger down to zoom out).
For example, this video of an older NOVA Origins video is fairly low resolution, and when maximized in the web-based player it yet won't play at full screen. This is a perfect situation to apply screen zoom for, which turns this:

Into this total-screen maximized version, simply by zooming in on the playing video:

Much better huh? It won't do a anything to resolve the lower resolution playback, but at to the lowest degree it doesn't take the large blackness bordering confined showing alongside all of the video, making the playback itself smaller than information technology needs to be. Sometimes merely increasing the spider web browser zoom works too for simply web video, but that shouldn't exist considered universally reliable enough to recommend for all situations.
That should be about information technology, enjoy your Mac-Television hookup, go watch some movies, browser the spider web on an enormous screen, game on the big screen, and accept fun!

Sidenote: If you happen to take an Apple Telly and a Mac running ten.8 or later, you tin just utilise AirPlay Mirroring and practise this unabridged matter wirelessly without the need for any cables or HDMI adapters. Typically AirPlay offers splendid video playback, but on weak wi-fi signals the connectedness tin can suffer, which is never a problem with a physical HDMI cable. Plus, the combination of an HDMI adapter and cable is about i/10th the price of an Apple TV box, making the method offered to a higher place a much more economical choice.
slaughterforithave1991.blogspot.com
Source: https://osxdaily.com/2013/04/28/connect-mac-to-tv/
0 Response to "what connecting cable do i need to connect my 2004 21 imac to 27 imac?"
Post a Comment